The other day, I set myself a twenty-four hour
challenge to make
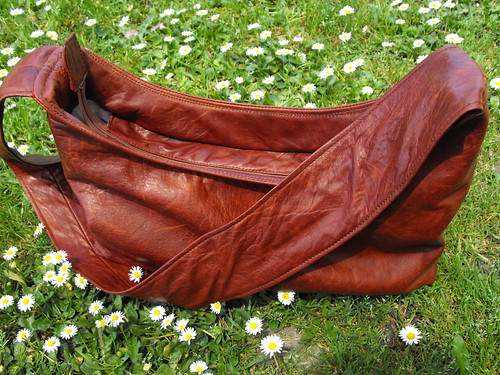
Nicole Malllalieu's
Hobo bag, using some beautiful antiqued, lambskin leather I had from
NSW Leather Co. I had been thinking about making this bag for a while, and with a Christmas "do" to attend with a new dress that all my current bags clash with, it was at the front of my mind. Someone had said on Facebook, that they managed to put one together in about three hours, and although they hadn't used leather, I thought I should at least have a go. I mean, I had 24 hours and who needs to sleep? (Me! I do!)
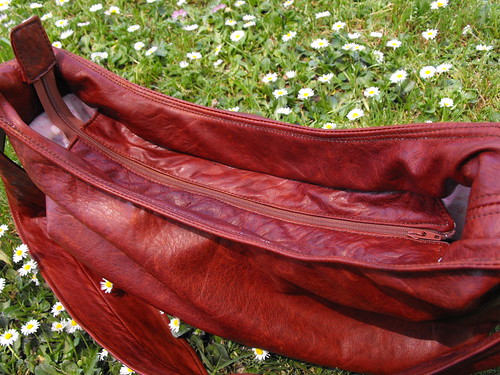
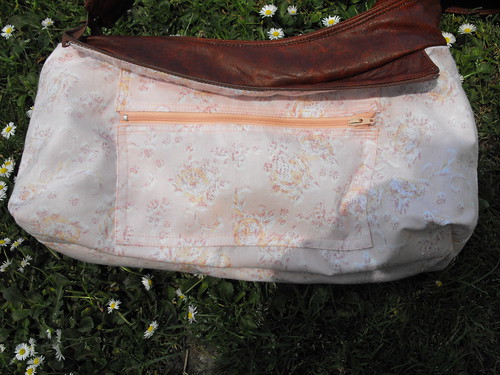
Well, it wasn't to be. I managed to get most of the outer bag constructed and then ran into some trouble inserting the zip. Trouble included some problems with leather that is a little stretchy, and some thread-matching and tension issues. In hind-sight, if I was making this particular bag again, I would make the zip gusset entirely from leather.
Something that I have learned about my machine is that it really does like the upholstery thread. I can't seem to be able to adjust bobbin tension enough to cope with other thread thicknesses, and even so, it is difficult to balance the tension so that there is no top thread showing on the bottom or bottom thread showing on the top. So I headed to a nearby store to get some upholstery thread in a lighter colour so it wasn't too dominant on the underside of the fabric.

I also found that the leather liked to stretch out a bit, so, combined with a non-stretchy lining fabric, it was a bit of work to get a nice, non-twisty zipper gusset going on. I found that going really slowly and carefully and using my new Clover clips, I was able to construct something that was acceptable. Switching from the zipper foot to the proper teflon foot, just for the stay stitching along the hidden edge of the gusset really helped. Actually, looking at the finished product, I am more than happy with it.
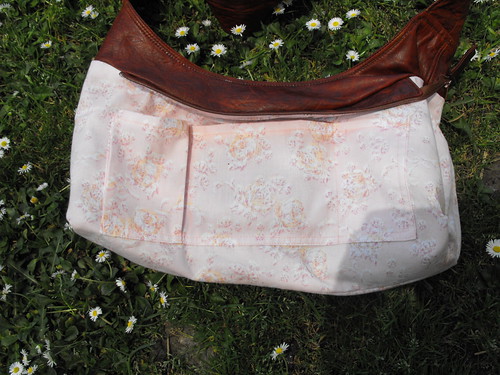
I used both of the pocket options for the lining. There is a zippered pocket and also another pocket with a pleated mobile phone slot. I did this pocket back to front to Nikki's pattern so that the phone pocket was easily accessible. (I had the zipper pocket closest to my body and the phone pocket further away). If I was only doing this pocket, then I would do it exactly as per the pattern. I am really fussy about the direction of zips too. I like my zipper head at the front when the bag is closed, both for internal and external pockets.
Another little grievance I have with my industrial machine is the feed dogs are a little harsh on soft, lambskin leather and can leave nasty track marks. I learned this when practicing making straps when I made my
Red Leather City Bag. When making the City Bag, I used tear-away stabiliser to protect the leather from the feed-dogs. I think it works fairly well, though I don't like the way the thread gets pulled when tearing away the tear-away. I thought this time I would use paper towel. I don't think I will do this again, as it is really tricky to remove paper towel fibres from under stitches. I have another idea that I might try next time.
I love the wide strap on the bag. I made it exactly to the pattern piece, although I only did minimal top-stitching, just along each edge as I think it worked really well with the leather I was using and the over-all slouchiness of the bag. I didn't use any o-rings for this bag. If I did, I would have preferred brass ones and I didn't have any in my stash. I think this was a good decision for this particular bag, there would have been a lot of extra bulk where the straps are attached, which I don't think would have suited the relaxed style of this bag.
Over-all, I am pretty happy with this bag. Could I have made the bag in twenty-four hours? Possibly. I'm not really sure? I am guessing that I actually spent about twelve hours making this bag. Maybe more? I have little kids though, so finding twelve hours out of a twenty-four hour period of time is nearly impossible. Realistically, I would give myself a week, or at a bare minimum, a weekend to make this bag again out of leather. I could make it a lot quicker in quilter's cotton, but I cannot see myself making the entire bag in three hours.